As a bureaucrat, most of the "Can you fix this?" requests I get involve columns of numbers, forgotten passwords and if I'm lucky, misfed media in the high capacity feeder (Oh, you want me to fix a paper jam? Why don't you just say so?)
Anyway, a couple of days ago a friend who works in my department told me the sad tale of a broken ballerina. She has two little daughters and the older girl has a "Jumping Jack" toy painted to look like a ballerina holding a tiny nutcracker. Well, little sister was playing a little rough and it resulted in a broken leg for the toy. (In my house it would also have resulted in threats of a broken leg to the younger sibling courtesy of the older one. Just saying.)
So the obvious question was "Can you fix her?"
Absolutely.
Everything wooden can be fixed.
That's part of why I love making wooden toys.
So, before I show the fix, let me explain the toy. Jumping Jacks are really simple toys that have been around for ages. According to "Easy to Make Old Fashioned Toys" they became popular in 18th century France and are often made from cardboard. (A pattern and instructions for making one out of card stock can be found in that book.)
In general, this is how they work:
The arms and legs have a have a hole in them and a peg or paper fastening clip goes through them and are anchored to the toy's body. Strings are tied to the tops of the limbs and then another string is tied to the center of both of those strings.
A loop of string allows the toy to be hung from a hook, doorknob or finger.
To play with the toy, just pull down on the string. The arms and legs will go up and down as the string is pulled and released. Pretty simple, huh? It is fun to watch because as you pull down, the limbs go up.
The difference with the toy I worked on is that the ballerina had a printed plywood front and back so the connecting parts are hidden. Also, instead of one vertical string connected to the two horizontal strings, all four limbs have their own string that all meet outside of the toy in a bead. It allows for a wider variety of moves because the limbs don't always move in unison. Pull more to one side and the limbs on the opposite side move more. Hey, even better, right?
Okay - Enough history and theory. We have a patient to save!
I got the ballerina home and started to give her a look. (Blood pressure was 0/0 and stable... So far, so good.) The limbs pivot on tiny wood pegs that if I had to take a guess would say that they are less than 1/32" thick. (Bamboo maybe?) In the middle is a small block to help support the "sandwich" of the front and back. There was no way to remove the back of the toy without breaking all of the remaining pegs.
I decided that I didn't want to drill out the holes for a replacement peg because then the repair would be harder to hide. Besides, I didn't even have a drill bit that narrow handy. So I bent the end of a very stiff steel wire and started to dig out some of the broken peg. My thought was to use a different, more flexible piece of wire to squeeze in to replace the peg. I lucked out though when the remainder of the peg slipped right out without damaging the rest of the toy.
Then I cut a length of that stiff wire off to form the new peg. The rod was a perfect fit in terms of thickness. I test fitted it a couple of times with and without the leg. Once it was cut to length, I super glued it in making sure that the leg still swung freely.
I cut the pink end off of the piece of peg that had come out. I intended to use it as a perfect plug. (Insipred by Crawfish's careful re-use of original parts.) Of course it was the size of a pinhead and I dropped it as soon as I went to plug the hole. *SIGH* No fear. A trimmed up piece if coffee stirrer wood and a little pink craft paint got the job done.
And that was that. It ended up being just a little fiddly but I really lucked out and it was a much easier repair than I thought it was going to be. Ballerina and owner have been reunited and all is right with the world. (Well, not really. But some kid is happy to get her toy back so that's good enough for me right now.)
It being close to Christmas and with most of my tools in storage pending the completion of our addition, it had actually been a pretty frustrating time for me. Usually I have a few toy in various states of assembly at this point and this year, nothing. This little project came along just in time.
This toy has turned into a bit of an onion for me. Layers upon layers of history, hope, disappointment, redemption, un-redemption (de-demptification?), resignation, and finally..closure. Anyway, I'll begin at the beginning.
A few months ago, a colleague brought her nine year old son to work as part of "Take Your Child to Work" Day. (I asked my wife if her office did "Take Your Man-Child to Work Day" but she refused to answer.) Anyway, seeing as how I am basically a nine year old boy as well, we hit it off. I showed him some pictures of my toys and he said the appropriately flattering things to make me want to make him a toy. (The kid is going to be a master manipulator one day. Just saying.)
I'm in a bit of a bind about all things toy making right now. My house is under renovation with an addition under construction (which will include my first honest to gosh real workshop! Look out world.) As a result almost all of my tools are in storage at a friend's house. What I do have on hand are hidden under piles of displaced kitchen utensils, paperwork and just stuff. I also don't have any place to work. Other than that... all set!
I did have a coping saw, my drill, some sandpaper and a Swiss Army knife. If I had a pair of hockey tickets, three AA batteries and the services of MacGyver, I could have made a satellite transmitter. Lacking those, I decided to focus on a toy that I could make just by hand. Sort of turn back the clock on myself and see how'd I do without a drill press, band saw, or belt sander. Kicking it old school.
So, what to make? Well, I had seen plans for a "Horse with Moving Rider" that I wanted to try in Ken Folk's "Folk Toys" The toy has a classy look and a simple action. There were a couple of things I wanted to change though. Most of the pattern called for 1/4" thick wood. I changed the body of the rider and horse to 1/2" and switched the reins from metal to 1/8" plywood from... you'll never guess... clementine box wood! (I still feel funny about having metal parts on my toys.)
The other thing I wanted to change was the subject. In the plans the rider has a classy 19th Century Guard/Light Cavalry vibe about him but I decided to change that. The kid I was making this for was born in Siberia and I have a family connecting to the White Russian Army during the Russian Civil War. So, a little research turned up a unit of Siberian Cossacks who fought on the side of the Whites (as opposed to the Reds) during the war.
Did I mention that just about all my wood is in storage as well? All I have on hand is a couple of boards from the Ikea's dented bin, a smoked salmon box (given to me after someone else had eaten all the lox... sigh) and of course, a few million clementine boxes.
Ron Hickman invented the Workmate
after using a chair as a work surface.
Just saying...
Almost from the start there were issues. I forgot how you need things like, oh, I don't know, horizontal surfaces to work on when you are cutting and drilling stuff. I have no workbench and my Workmate has finally given up the ghost. I resorted to using the arms of an Adirondack chair I had built about 15 years ago. I got it done, but a lot of lessons needed to be re-learned from my earlier toy making days. The main thing I took away was that technology had allowed me to become sloppy. You need to take your time and cut as accurately as possible the first time because if you didn't have a band saw and belt sander to clean up your mistakes, you'll spend a lot more time on the project. I miss my electricity, but clearly there is joy to be taken in taking your time and working with hand tools.
The lox box wood provided the arms of the Cossack and the legs and sides of the horse. I needed to orient the printed sides so that they would face inward on the completed toy. So a bit of sweat, a few choice words and a nick or two on the arm on my chair and the hand on my arm and presto - assorted Cossack pieces.
I then started mucking with the design to give him more heft.
I wanted him to have a Cossack hat - dare I say a papaha (your vocabulary word for the day) and for his torso to actually rest on the horse and match up closer with the legs that I decided to cut out instead of just paint on the horse. For all three of those additions, I cut the pieces out of 1/8" clementine box wood.
I should have glued the hat and sides on first and then cut out the bodies. Not doing so led to some time consuming tweaks and hand sanding. Live and learn.
All in all, cutting the pieces went about as well as could be expected but I wasn't entirely happy with the cuts. A bit too much splintering on the plywood arms and horse sides, but not awful.
I then started assembly and all was not well. There wasn't a good fit on some of the the pieces. The way the toy works is that the rider's body is a long pole that extends through a hole in the horse's body. Then underneath the horse a cam moves a lever up and down that causes the rider to bounce up and down as the toy is pushed. Should have been simple, but the peg really needs to be smaller in order to move freely in the hole of the horse's body. Also, I did need to re-cut the lever because at 1/2" thick, there was no way it was going to move as freely as I would have liked without hours of sanding. So I made it 1/4" thick and that was too small so I shimmed it out with... yes... clementine box wood and some coffee stirrers. At this point I was pretty sure I was under some sort of Cossack Curse.
Ultimately though, my biggest problem was really an issue with the basic concept of this toy.
Once I made the toy thicker, I crossed a line between making the rider in profile vs making him "realistic." I was moving more from toy towards doll or model and that is not what I wanted. At 1/4" thick, the profile approach was fine but once he became better proportioned and I added his hat and jacket I ran into problems. Specifically with his head. His nose stretched across his whole face. It just didn't look right especially as I added more details to him. Discouraged, I put the toy aside for several weeks.
Early paint job. Clearly the lad needs some sun.
The nose and mouth were clearly wrong for the toy.
Luckily, I filled part of this time exiled from the shop with recording PBS woodworking shows. One of them is Rick Bütz's woodcarving show and I got some priceless pointers on starting to carve and whittle. (Chief among them- sharp knives are safer and a lot of little cuts, not a few big cuts, are definitely the way to go.) Newly inspired, I went to work on the Cossack's head and gave him a proper nose and a little definition to his face. Not perfect but seeing as how the first time I tried to carve a little bear five years ago I ended up with a carved thumb and something that looked like a pig, I considered this quite the leap forward. If you've never seen Rick Bütz's show or books, they are definitely worth checking out. I highly recommend them.
So better, but still not right. He looked far too fresh faced to be a Cossack. So I painted a beard of sorts on him. (Honestly, this toy took so long to make, he could have grown his own beard.... if he was actually alive... and not made of wood.) I also gave him a slight scar on his left cheek to toughen him up a bit. He is a Cossack after all.
Since his reins were not bent metal, I'd worked on the spacing of his arms to give enough clearance so they could move without any problem. The reigns are glued to an 1/8" dowel that serves as a bit in a hole right behind the horse's mouth. I drilled the hole slightly large than 1/8" so that it could rotate freely. The other ends of the reins are glued to 1/8" dowels that pivot in the rider's hands. Again, through slightly larger holes.
I moved to final assembly and attached the wheels, reins, and a saber. As with the arms, 1/32" balsa spacers make sure I'm leaving enough space for the moving parts to move freely. I could use washers, but again, I'm staying clear of metal on my wooden toys right now. I then tweaked up the paint and sprayed him with a gloss acrylic finish.
Done.
Finished.
Never again...
Oh who am I kidding? I love this guy! We've been through a lot. If he wasn't a Cossack, I'd give him a hug.
Philip the II's Spanish Armada...
Teddy Roosevelt's Great White Fleet...
Admiral Halsey's Third Fleet...
All pale in comparison to Toy Making Dad's Fish Tin Flotilla.
When I was I little, my buddy Jack had a toy boat that he told me used to actually propel itself around the bathtub or pond using just a candle for power. It was made of tin and had two narrow tubes that ran down the hull and extended just a bit past the stern. It was missing the magic part that made it go so his boat was relegated to being a landing craft for our Airfix soldiers as they staged amphibious assaults on our rec-room carpet. Still, the idea that a toy boat could move with just a candle really stuck with me.
Flash forward thirty something years later, right to the moment that I was sure I had found absolutely everything on the internet there was to find. Suddenly I thought about Jack's boat. A quick search for "candle powered toy boat" opened my eyes to the world of "pop-pop" boats and closed that little loop from my childhood.
In short, it really does work with just a candle and a little water. It is one of those toys that relies on a bit of simple science but at this point, since most of us are so removed from all things mechanical or steam related it seems magic. In short:
A small amount of water is in a shallow metal "boiler" (a tube or flat-ish pan with a flexible top or bottom.)
A flame heats it.
The water heats up rapidly and flashes to steam.
The steam escapes from two tubes that lead from the boiler out the back of the boat and into the water.
A vacuum then forms in the boiler and sucks fresh water back in through those same tubes.
As soon as the water hits the inside of the boiler, it turns back into steam and the process starts over.
And for us visual learners...
(Click to enlarge)
Simple, huh? One other thing... it happens crazy fast. Multiple times a second fast. When you use the flat boiler type a rapid putt-putt or pop-pop noise starts and it really adds to the fun.
I found instructions on how to make a really simple flat pan type of boiler here - http://www.sciencetoymaker.org/boat/index.htm and I won't pretend that I could describe the process any better that you will find there. My only advice is follow the instructions exactly and don't rush through it. Take your time and make nice clean folds.
I decided to use copper tubing instead of the drinking straws though because I wanted the toy to last 6 or 700 years. On this one I used tubes that have an outside diameter of 3/16". Bend the tubes to the correct angle before you epoxy everything into place. It makes things much easier and you'll be less likely to damage the boiler. I also used the legendary JB Weld two part epoxy to seal everything up. The stuff really is amazing.
I wanted to use a metal hull but since I lack soldering skills, I didn't trust myself to follow any of the hull patterns that are out there. So, I turned to one of my great little joys in life... Smoked Herring!
Okay, I could go on for hours about how wonderful smoked herring is (and honestly I have on numerous occasions) but there is a time and a place for everything. Basically it is wonderful stuff and some brands come in these deeper rounded cans. (This one is from Germany and I purchased it at Trader Joe's.) The rounded edges make it less likely to run into a wall and stop moving. After you let the cat finish cleaning out the tin, you can run it through the dishwasher to get it super clean.
I drilled two 3/16" holes out the back of the can and used some more JB Weld to hold the boiler assembly in place. Unfortunately, I didn't take any pictures before I took it for its maiden voyage so it looks a bit sooty here. The coins were all at the back to help push the stern lower in the water and to keep the tubes submerged.
And here is the first boat in action:
Another kind of flash boiler you can make is with a simple coil of copper wire.
It works on exactly the same principle as the other style boiler but requires no solder or epoxy to create and is just one continuous piece of tube. So, this makes it super easy to make and long lasting. You really could knock one of these out in just a few minutes. The only drawback... a very muted or non-existent pop-pop noise as it motors around.
For my hull, I strayed from the wonderful world of smoked herring and took a stroll down the international aisle and found this delightfully shaped and quite colorful tin of Japanese sardines in sweet soy sauce. (The fish are actually from Thailand... the can from Japan. Yes. I read labels... and yes I only purchased it because it looked cool. And YES, I actually ate it. Not bad, but clearly not smoked herring.)
Since this is a smaller boat, I went with 1/8" outside diameter tubing. I drilled a 1/2 diameter hole in a piece of scrap wood and put a 1/2" dowel in it. I then took a length of the copper tubing and tightly wrapped it around the dowel five times making sure that the last loop ended with the tube heading in the same direction as I started. I also made sure that the long pieces away from the coil were going to be long enough that when bent to their final shape a candle could sit under the boiler and the tubes would still be long enough to extend past the end of the hull.
Have a long enough lead before your
first bend for the boiler
Keep the tube tight as you wrap it.
I bent the leads to the boiler so that the boiler would stand up about 1 1/2" once it was installed. I also bent them out slightly. Then with the hull flipped upside down, I marked and drilled 1/8" holes making sure that the tubes would extend past the end of the hull. I flipped it back upright and used JB Weld to hold it in place and make the holes in the hull watertight.
Putting the holes through the bottom guarantees that the tubes will be submerged. I didn't get the weight quite right on this so the boat was a bit too bit stern heavy when she went out for her sea trials. I just left an unlit tea light candle at the front to counteract that. I also used a cut down small candle because while it doesn't burn as long as the tea lights do, the flame is clearly larger.
Here you go:
As fun as the obvious use of fish tins has been, I'm working up for the next boat to actually look like a boat. Preferably something that looks like a tug or steam boat. I now see these larger sardine cans that have the perfect shape I'm looking for and the cans themselves are not printed on; it is just a paper label. They are deeper and slightly longer than the herring tins with a more pointed bow and stern shape. And... with this brand I've noticed that the sardines are actually listed as being herring! YEAH!
Oh, and if you aren't a fan of canned fish. No worries. I'm sure you can find someone or something around the house to give you a hand making sure the fish doesn't go to waste. I sure did.

 As a bureaucrat, most of the "Can you fix this?" requests I get involve columns of numbers, forgotten passwords and if I'm lucky, misfed media in the high capacity feeder (Oh, you want me to fix a paper jam? Why don't you just say so?)
 To play with the toy, just pull down on the string. The arms and legs will go up and down as the string is pulled and released. Pretty simple, huh? It is fun to watch because as you pull down, the limbs go up.
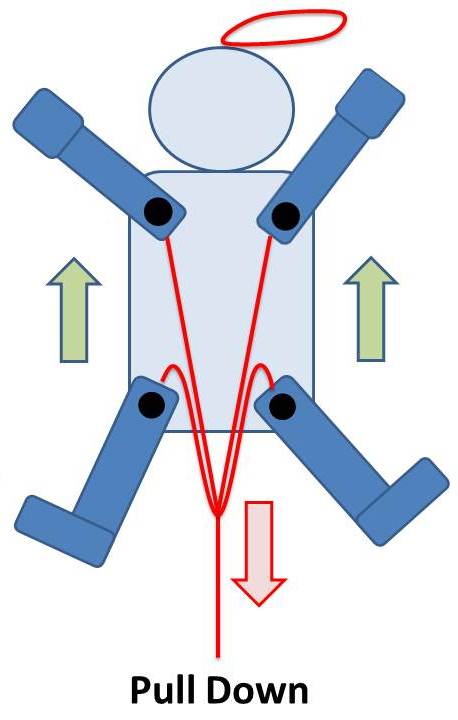
 I got the ballerina home and started to give her a look. (Blood pressure was 0/0 and stable... So far, so good.) The limbs pivot on tiny wood pegs that if I had to take a guess would say that they are less than 1/32" thick. (Bamboo maybe?) In the middle is a small block to help support the "sandwich" of the front and back. There was no way to remove the back of the toy without breaking all of the remaining pegs.
  I decided that I didn't want to drill out the holes for a replacement peg because then the repair would be harder to hide. Besides, I didn't even have a drill bit that narrow handy. So I bent the end of a very stiff steel wire and started to dig out some of the broken peg. My thought was to use a different, more flexible piece of wire to squeeze in to replace the peg. I lucked out though when the remainder of the peg slipped right out without damaging the rest of the toy.
 I cut the pink end off of the piece of peg that had come out. I intended to use it as a perfect plug. (Insipred by Crawfish's careful re-use of original parts.) Of course it was the size of a pinhead and I dropped it as soon as I went to plug the hole. *SIGH* No fear. A trimmed up piece if coffee stirrer wood and a little pink craft paint got the job done.


